Frequently Asked Questions
Find answers without digging through the site.
Browse Buzzen help topics and answers from the existing FAQ library. Open a section, select a question, and use the direct link when you need to share a specific answer.
Browse help topics
Questions remain grouped using the existing Buzzen FAQ library.
To register for your own account click on this link Here. Once you fill out all of the fields on the registration form and submit. Make sure you check your junk mail for your activation email. If you do not recieve it in either regular inbox or junk mail please visit our helpdesk for assistance Here.
First make sure to whitelist buzzen emails in your providers settings. To see how to do this click Here
To get an activation email resent please click Here. Depending on your email settings your activation email may land in your junk mail folder. If your settings are set to delete all junk mail then please visit our Helpdesk for assistance.
To delete your account click Here. Also located under your picture on the page called "My buzzen".
You can change your Buzzen nickname by clicking HERE.
Some email providers such as hotmail, gmail, yahoo etc have very strict spam controls on their email services. As such at times Buzzen emails do not get through to a users inbox. Emails such as registration, bsr renewals etc. may not get through. To prevent this from happening follow the steps to whitelist Buzzen with your provider
Login to your Gmail account.
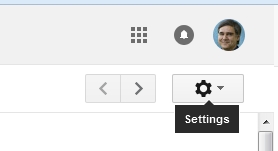
In the upper right corner of the screen click on the gear icon which represents your settings:

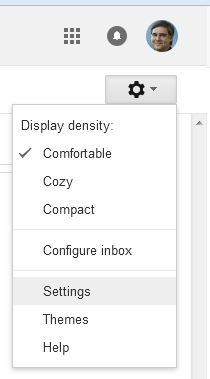
In the drop down menu, click on the “Settings” selection:
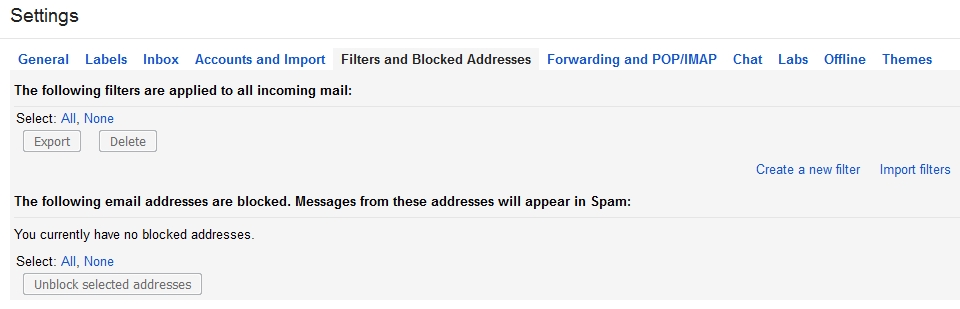
On the Settings screen, click on the “Filters and Blocked Addresses” tab:
Next, click on “Create a new filter”. A dialog will appear which looks like this:
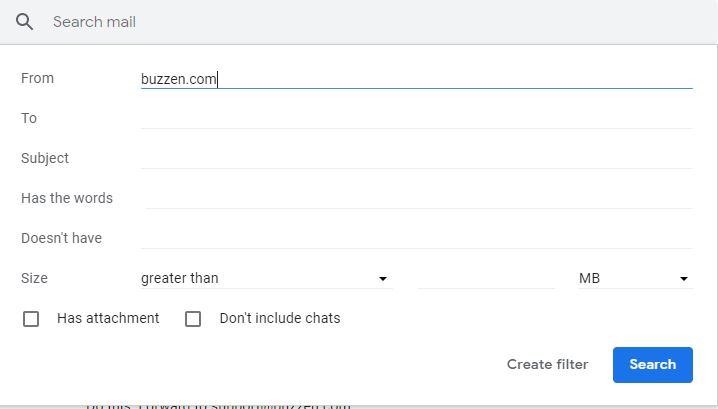
In the “From” box, type the domain or email address which you would like to whitelist. In our example above we have used “buzzen.com”.
Next, click “create filter with this search”. Another dialog will appear which looks like this:
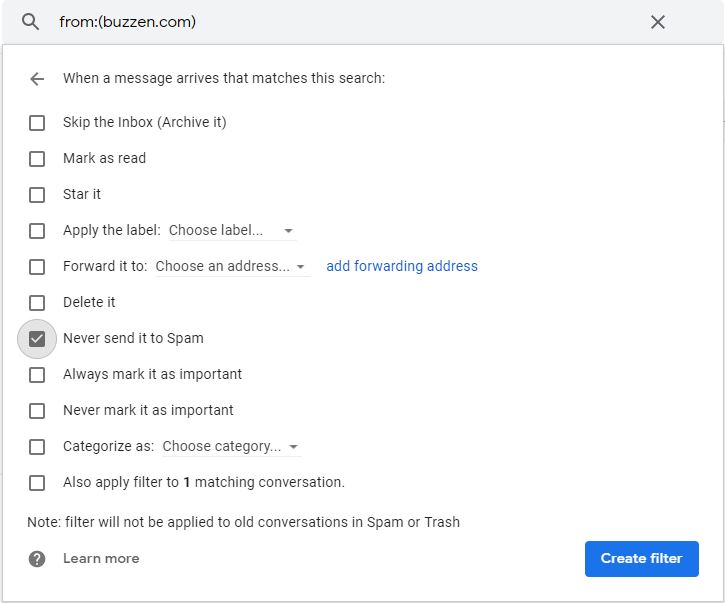
Check the box “Never send it to Spam”. This will ensure that you always receive email from this domain. You may also want to check “Always mark it as important”.
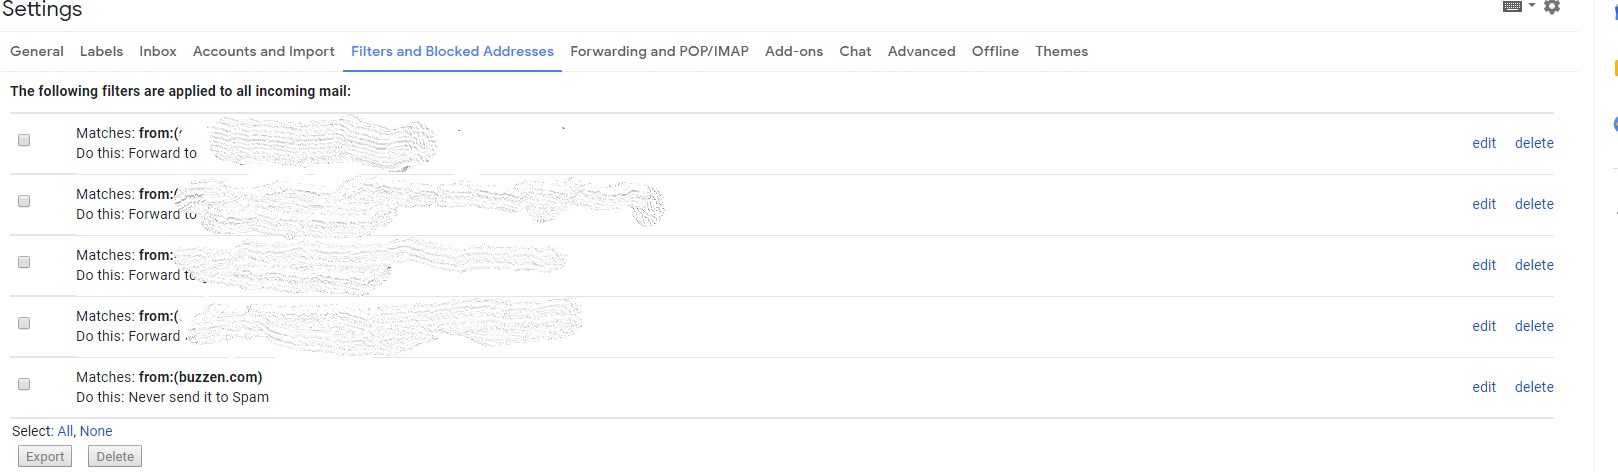
Click the “Create filter” button. You will receive a confirmation screen showing that “Your filter was created.” and you will be able to see the filter like this:
Login to your Hotmail/Outlook/live email account.
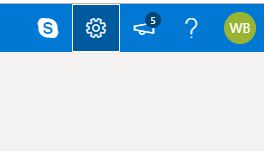
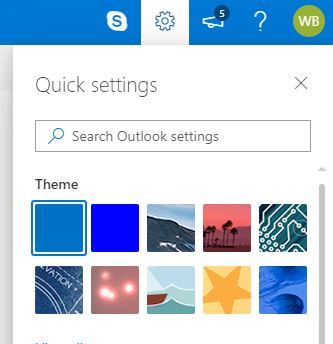
In the upper right corner of the screen click on the gear icon which represents your settings:
In the Search Outlook settings box type in safe.
You will see a list pop up. the first entry should be Safe senders and domain (as highlighted in the following image. Click on it.
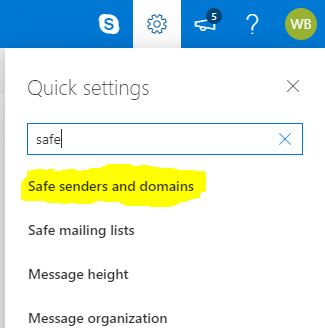
You will see the following dialog open. Under the safe senders and domains click the add button
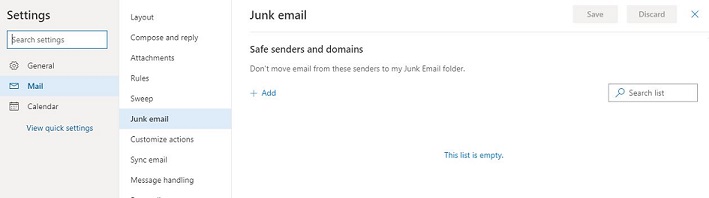
Enter buzzen.com in the entry box.
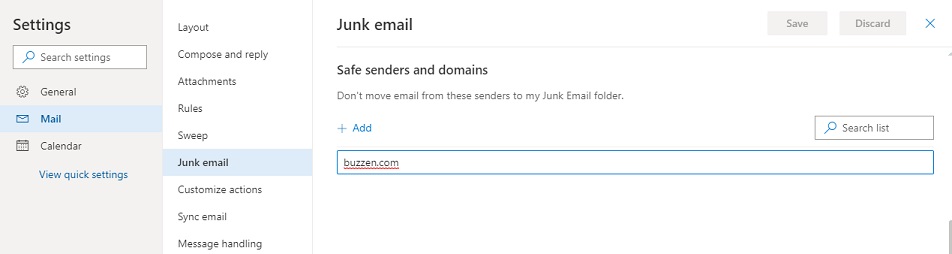
Click the enter button and you will see the following:
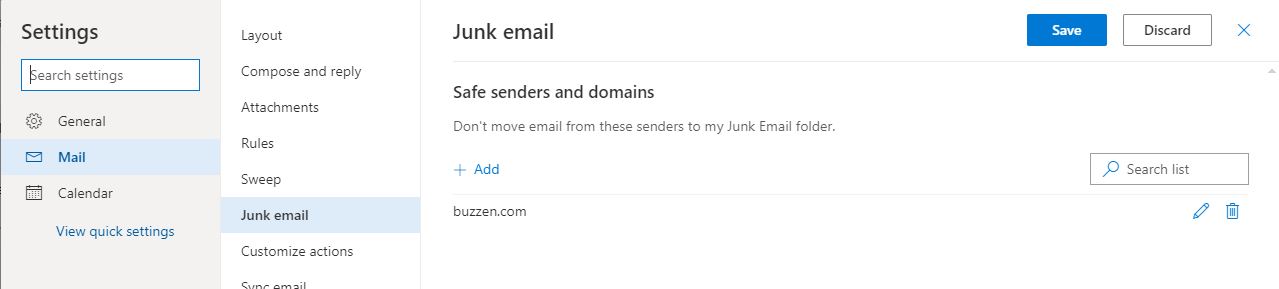
Now click save in the upper right corner of the dialog. To safe this setting and you can exit the setings dialog back to your mail or close out your mail.
To remove a room from your favourites list follow these instructions:
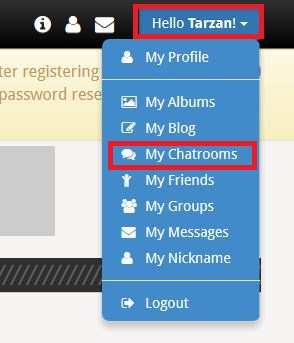
Once logged into the Buzzen website. At the top right click on the Button with your nickname in it as shown and Click on My Chatrooms:

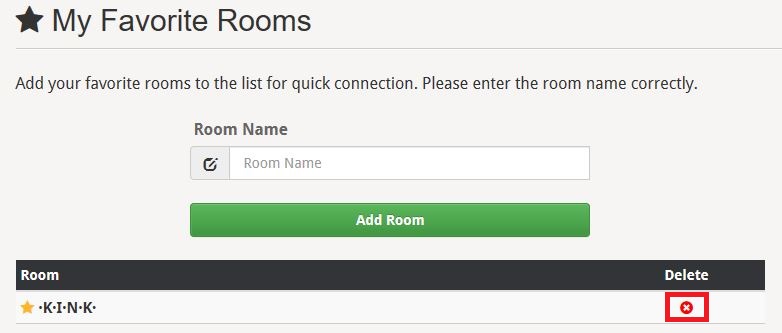
This will load the My Chatrooms Page. Once on the page. you will see under Room a list of rooms you have favourited. To the right of the room name you will see the delete icon ( in the red square in the following image). Just click the delete icon and then select OK on the confirmation popup.

Follow the last step to remove each room you wish removed from your favourites list.
- Log in at www.buzzen.com using your normal password.
- Go to https://www.buzzen.com/password.html
- Change your password. Make sure you get the popup confirming your password changed and displaying your new password
- Log out and then log back in with your new password
- Join Chatroom
A BSR stays open 24/7 whether users are there or not. These rooms are owned by a Buzzen member. The room owners and hosts make all the rules for their rooms but have the ability to have Buzzen Staff assist them per their request.
Some of the perks for a BSR
24/7 Staff support for adding owners/hosts, dealing with unwanted users, and general room support.
Always open
Higher chat listing
Permanent ownership as long as the room is in BSR status.
Saved access list
etc..
For a donation of 50 USD Dollars a year you may have the use of a buzzen supported room, this room remains open 24/7, gets special support from staff, enables you to request IP bans, among other benefits. Room name can not be longer than 35 characters, must not contain inappropriate words, and needs to be as original as possible.
To make the donation please go HERE. Once you have you made your donation please go to Helpdesk to complete the process!
If you feel you are being harassed or being unfairly treated by another member or by Buzzen Staff you may visit the Helpdesk or you can use our support ticket system.
The support ticket system is confidential and is only accessed by top tier Buzzen management. Please include as much information as you can concerning the issue as well as screenshots.
You may create your own room by clicking HERE. This is known as a User Created Room. It will remain open as long as at least one person is in the room. If it closes anyone may reopen it. A room that doesn't close is called a Buzzen Supported Room. To learn more about this type of room please visit HERE.
- Clear browser cache, pressing CTRL and F5
- Wireless has problems due to low signals
adsl routers may need to be rebooted. To do this shut down pc and turn off unplug router plugs wait 20 seconds then replug and connect - You may need to do a DNS flush * To do a DNS flush,Windows 8 and below Go to start then run and type in this ipconfig /flushdns then restart your computer. Make sure you leave a space between the G and the / Windows 10 in the search box type in cmd and press enter in the command prompt type in ipconfig /flushdns then restart your computer. Make sure you leave a space between the G and the /
- Check all cookies, temp files and all past history has been cleared in internet options
- Try to connect via the room list, sometimes links in favorites are corrupt.
- Check the chat client template, set it to either a color theme or default. : http://chat.buzzen.com/NBWChat/default/nbchatoptions.htm?v=1.4
- Closing the browser and restarting can sometimes override the non connect
- Check if time, date, month and year are all correct
- Check security is not set to high on trusted sites it should be on default medium low and that chat.buzzen.com and buzzen.com are added as allowed sites
Buzzen now uses a WebSocket based web chat. If you experience an issue with the chat pane, not loading trying clearing your browser cache as shown in the following faq
/faq/49
Also, some browser addons can stop the WebSocket from loading so check if you have any extensions loaded and if you do disable them one by one and try and see if it chat loads.
Some antiviruses can stop the WebSocket from loading. If this is the case check with the developers of your chosen Antivirus software on how to allow the WebSocket through.
Buzzen webchat supports the following commands. They must be prefaced with a /
You can view a menu of these options by typing /? in your chat window.
/Reconnect : auto leave and reconnect to the room
/Disconnect : leave the chatroom
/Clear : clear all the previous text from the chat window
/Away : set an away message and set status to away
/Unaway : set status back from away
/Nick : Change your nickname ( not supported in Buzzen Rooms
/DebugPrint : used to help debug web chat
/Showguestpassstored : show the room guest password if the room is owned by a guest nickname
/SaveGuestPass Save a new guest owner password
/Kick : kick the highlighted nickname in the userlist with a message
/Ban15m : ban the highlighted nickname in the userlist for 15 minutes with a message
/Ban1h : ban the highlighted nickname in the userlist for 1 hour with a message
/Ban24h : ban the highlighted nickname in the userlist for 24 hours with a message
/Topic : change the room topic
/Welcome : change the room welcome message
/+/-Protectionmode
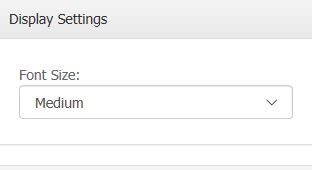
In the chat options Top of chat window Options Under Display Settings you can adjust the font size
Overview: Buzzen uses specifically formatted codes to produce colors in the webchat. You can use these colors in various areas of buzzen including the room Topic.
To achieve the above effect you would format the text like so [style ff:Comic Sans MS;co:#FF0000;b;]Welcome to the [/style][style ff:Comic Sans MS;co:#0000FF;b;]room![/style]
ff stands for FontFace and can be any font. Note the person must have that font installed on their pc to read it in that font so be sure to use common fonts such as arial, tahoma, etc
co stands for color. You can use color names such as red or blue and you can also use color codes such as #FF0000. For a full list of color codes see http://www.immigration-usa.com/html_colors.html
the b is for bold
i would be for italic.
Make sure you have the proper format with a semi-colon after each type. such as b; or i;
always make sure you end the text with [/style]. If you have more than one style in a message please close one before starting another.
If you were banned from a Buzzen Supported Room (bsr) or a User Created Room (ucr) there is nothing that the Buzzen Staff can do about it. These are private rooms and they may kick/ban for any reason they would like. Buzzen staff can not interfere with a UCR unless it is a C.O.C. violation and may only help in a BSR if the owner requests it or it is a Code of Conduct violation.
If you are banned from a Registered Chatroom by Buzzen (
Ghosting happens when you are disconnected from chat but your nickname does not immediately leave the room. When you try to rejoin the room in that instance it will change your nickname by adding numbers to the end. This is because you can not enter a room that has a user with the same nickname. Even if it is your own. Your "Ghosting" nick should leave on it's own shortly.
If you have been kicked for "Ghosting" then you should simply click the browsers refresh button 
(usually found on the left side of the address bar). This is usually done so that you can go back to using your normal nickname.
If you constantly have ghosting issues. Some of the following corrective measures might help.
- Restarting your modem and router - this means completely unplugging both from the power. If you use an ISP gateway (modem and router in one unit) wait 1 minute after unplugging it before plugging it back in. If you use a separate modem and router. Unplug both wait one minute, plug the modem back in and wait for it to boot up (approx 2 minutes), then plug the router back in and let it boot up.
- Run a virus/malware scan (malwarebytes free is a good choice to check for malware).
- Clear your browser Cache and temp files. Instructions can be found here: /faq/49
Buzzen is now cross-platform accessible. You can chat from any modern browser that has WebSocket support. Including Edge, Internet Explorer, Chrome, Firefox, Opera, Safari and most mobile browsers support WebSockets
SuperOwner tools are options available only to the superowner of the chatroom. They enable the superowner to control all options of their room.
Control Dialogs
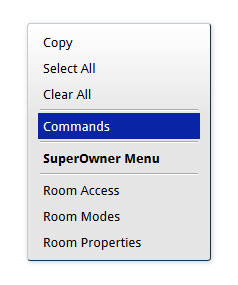
SuperOwner control dialogs can be accessed by right clicking anywhere in the chat area.
Room Access Dialog
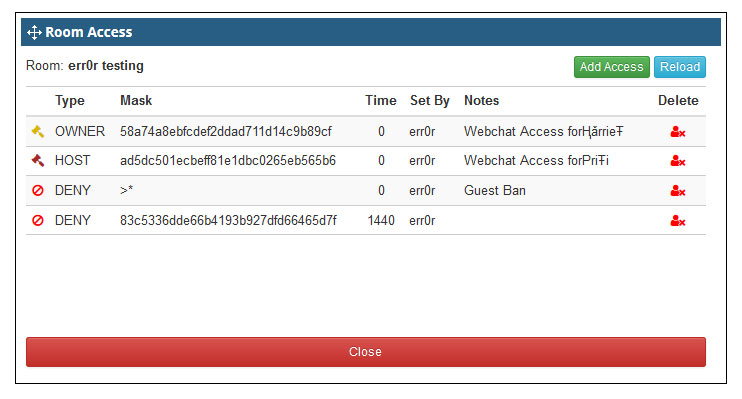
The room access dialog controls access of the room. Including: Owner, Host, Grant, Voice, and Deny. There are various ways to add an access entry including nickname, ip, and passport. The user's "Passport" is the most common method. Superowners can see the user's passport when they join or leave. They can also check it using the nicklist superowner menu.
example: › Li has joined the conversation. Passport: 58a74a8ebfcdef2ddad711d14c9b89cf
The passport for Li is 58a74a8ebfcdef2ddad711d14c9b89cf
You can use this passport to add access entries.
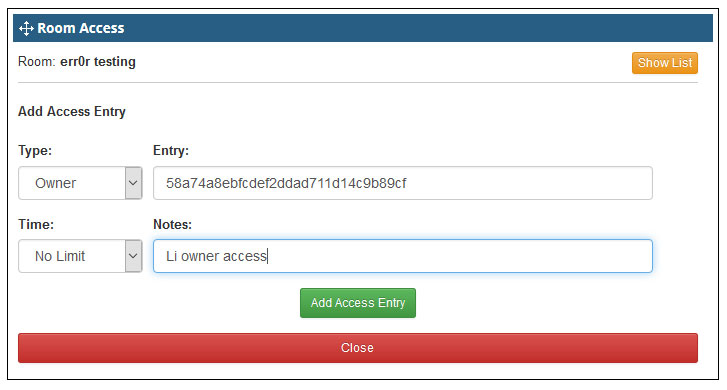
You can also add by nickname and IP. Only staff members are able to get a user's IP address. You are able to use *wildcards* in access entries as well. For example if you wanted to ban anyone with the word "jerk" in their nickname you would enter *jerk* into the entry field.
It is not recommended that you use a nickname for Owner, Host, Grant, Voice entries. Nicknames can be cloned and are not safe to use in this manner. Using the passport is the best approach.
Room Modes
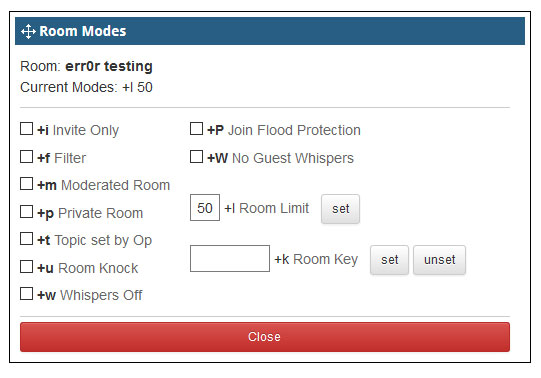
Room modes control various features of the chatroom. By checking the mode you turn the mode on. By unchecking it you turn the mode off. You can also set a room "key". With the key set users will need to know the room key/password in order to gain access to the room. This is not the same as an owner/host password. This key is simply to require a password to enter your room.
Room Properties
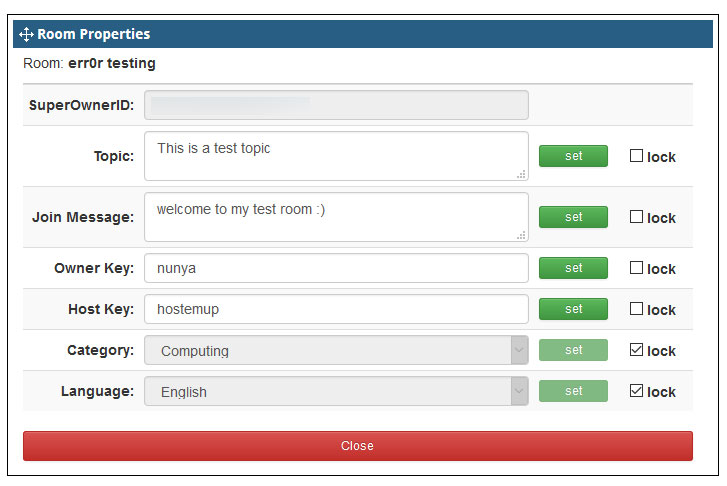
Room properities dialog allows you to set various information concerning your room. You can also lock these settings so they may not be changed unless they are unlocked.
As the "SuperOwner" of a room you have the option to Ban & Un-Ban guests from your room. There are a couple of options that you can use to achieve this.
First you can use the room commands. To see a list of supported room commands you can type /? into the room or right click in the chat window and choose "commands" from the popup window.
The result will look like the following:
Commandline commands supported in this client: FixScroll, Reconnect, Disconnect, Hop, Sizzle, Clear, Away [<Away Message>], Unaway, Nick <Nickname>, DebugPrint, ShowGuestpassStored, SaveGuestpass <Guest Password>, Kick <kick message>, Ban15m <ban message>, Ban1h <ban message>, Ban24h <ban message>, Guestban, Guestunban, Guestmircban, Guestmircunban, INVITE <username>, TOPIC <topic message>, WELCOME <welcome message>, +/-PROTECTIONMODE. Commands must start with /
In this list of commands you will see Guestban, Guestunban, Guestmircban, Guestmircunban.
/Guestban will ban all guests from entering your room.
/Guestunban will remove the ban of all guests.
/Guestmircban will only ban guests using 3rd party clients to connect to chat as a guest.
/Guestmircban will only remove the ban of 3rd party clients chatting as guests.
This does not kick the current guest nicknames in the room. It only prevents them from joining.
The other option is to use the SuperOwner Room Access dialog which you can access using the room popup menu.
To add a guest ban you click the Add Access Button. Then in the entry box add >*
Choose the Deny time limit and press the Add Access Entry button. You will see the entry has been added. You can remove the ban by removing the entry.
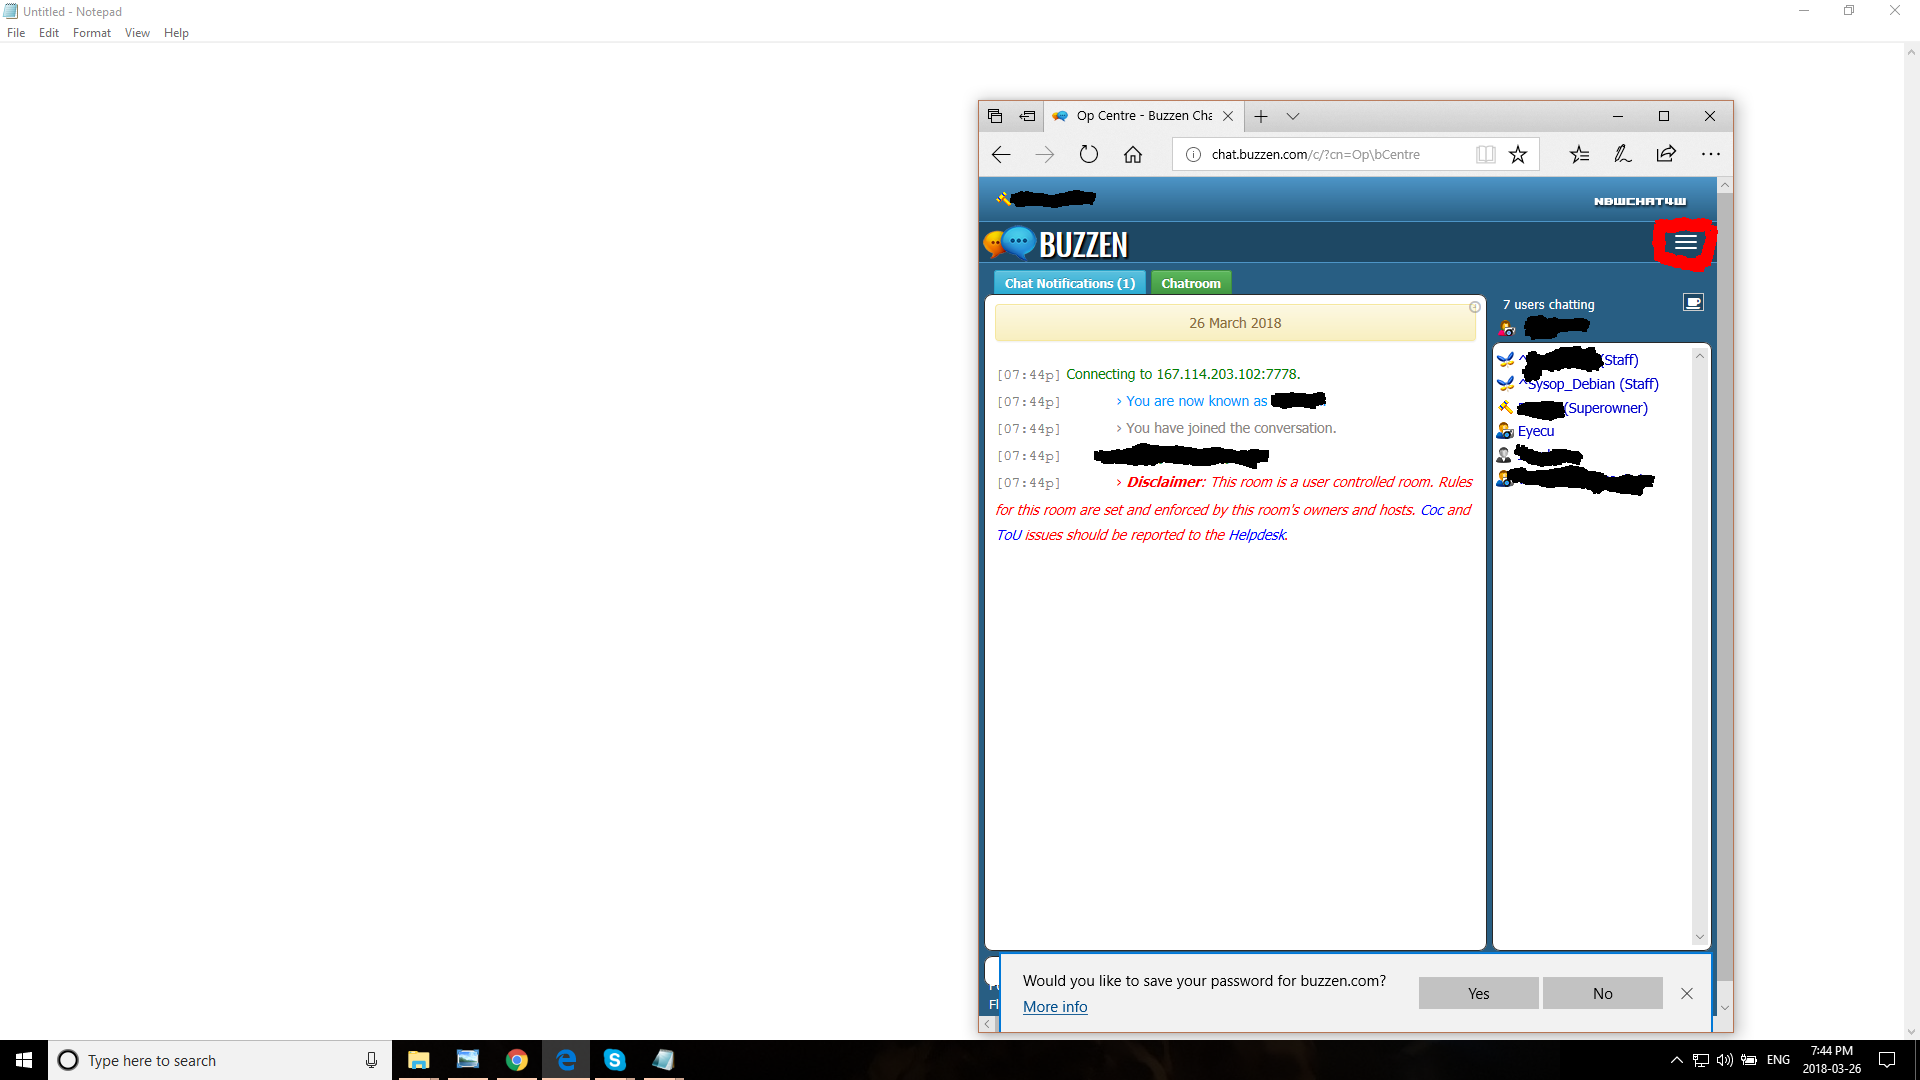
If you are in chat and notice your chat options bar is missing...the bar along the top of the chatroom where Home More Rooms, Options etc is normally. As in the following image:

It is due to one of three reasons
- Your resolution is set to small to display it.
- You are zoomed in too close for it to be displayed properly
- You have your browser off maximize and set to a too small of a viewing area for the bar to be displayed
In any case when this happens you will get a drop down menu at the top right of the chat that has these options in it now. As in the following image.
Note: The dropdown menu is located at the top right of the chat area just above where the cup icon is to go away.
- i : Set room to invitation only. Only users that are /invited may enter.
- f : Room filter. This will filter out certain profanity form showing to the room.
- k : Room key. This will set a room key that must be used to enter the room.
- l : Room limit. Set the max limit of users that the room will accept.
- m : Room is Moderated. Only users with voice +v may send messages to the room.
- p : Room is private.
- t : Only a host or owner may set the room topic.
- u : Room Knocks. This will show room owners if a person sends a Knock to the room.
- w : Normal users cannot whisper non-hosts (note that this is a lowercase w).
- P : This is room join flood protection.
- W: Guests cannot whisper non-hosts (note that this is an UPPERCASE W).
- Topic : Set the room Topic
- Onjoin : Set the room onjoin message.
- Owner : Set the room ownerkey.
- Host : Set the room hostkey.
If you see the predictive text (text suggestions) popup in your browser it is a new setting in Windows. As seen in the following image:
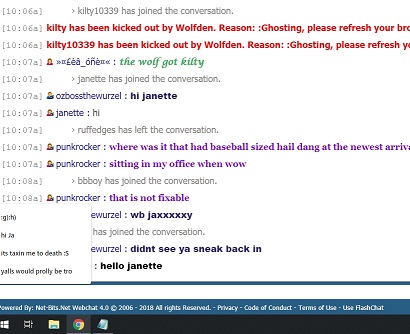
Steps to turn off predictive text suggestions.
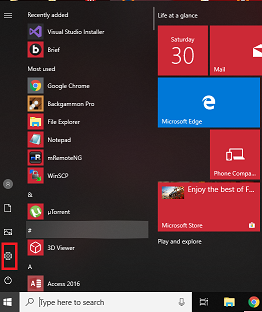
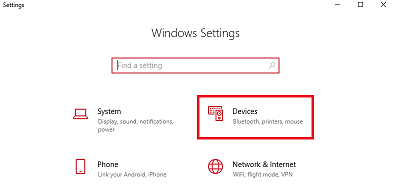
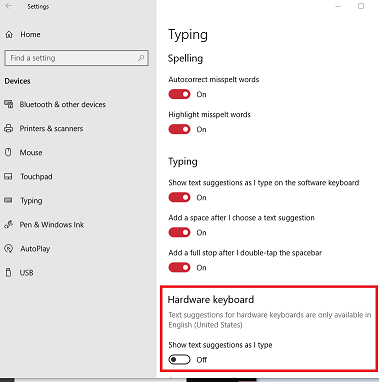
Note: All steps and places where you need to click are noted by a red box around the area to click in the images.
1) Click on the start menu button in the lower left corner of your screen:

2) Click on the Settings Icon on the left side of the start menu:
3) In the Settings dialogue. Click on Devices:
4) In the Devices window on the left side click on Typing:
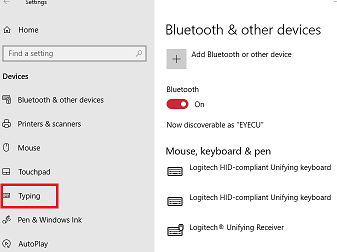
5) In the Typing window on the right side you need to scroll and find Hardware Keyboard, and directly under that you will see, Show text suggestions as I type. with a toggle switch underneath. Click the toggle switch to turn it off.
A cookie, also known as an HTTP cookie, web cookie, or browser cookie, is a small piece of data sent from a website and stored in a user's web browser while the user is browsing that website. These must be turned on in your browser to access all of what Buzzen offers.
To turn cookies on in Microsoft Edge, click the three-dot menu in the top-right corner of the browser and select Settings. In the left menu, click Privacy, search, and services.
Scroll to the Cookies section and make sure Block third-party cookies is turned off. If a website still says cookies are blocked, check the site’s permissions or add the website as an exception so Edge allows cookies for that site.
You can also type this into the Edge address bar to go there directly:
edge://settings/privacy
Microsoft’s current help pages list the path as Settings and more → Settings → Privacy, search, and services → Cookies.
To turn cookies on in Firefox, click the menu button in the top-right corner of the browser and select Settings. In the left menu, click Privacy & Security.
Under Enhanced Tracking Protection, make sure Standard is selected. This is Firefox’s default setting and allows cookies, except for known trackers. If Strict is selected, change it to Standard. If Custom is selected, either uncheck Cookies or set it to block only cross-site tracking cookies.
If a specific website still says cookies are blocked, scroll down to Cookies and Site Data, click Manage Exceptions, and make sure that website is not listed as blocked. Changes are saved automatically. Mozilla’s current help page lists this path as Menu → Settings → Privacy & Security, with cookie controls handled under Enhanced Tracking Protection.
To turn cookies on in Chrome, click the three-dot menu in the top-right corner of the browser and select Settings. In the left menu, click Privacy and security, then choose Third-party cookies.
From there, select Allow third-party cookies. If you do not want to allow third-party cookies for every website, you can instead add a specific website under Sites allowed to use third-party cookies.
Please note that cookies are usually required for websites to keep you signed in, remember preferences, and work correctly. Chrome may still block third-party cookies in Incognito mode by default. Google’s current Chrome help page lists the path as More → Settings → Privacy and security → Third-party cookies.
The following will explain the step to create a group and some of the settings used in the process.
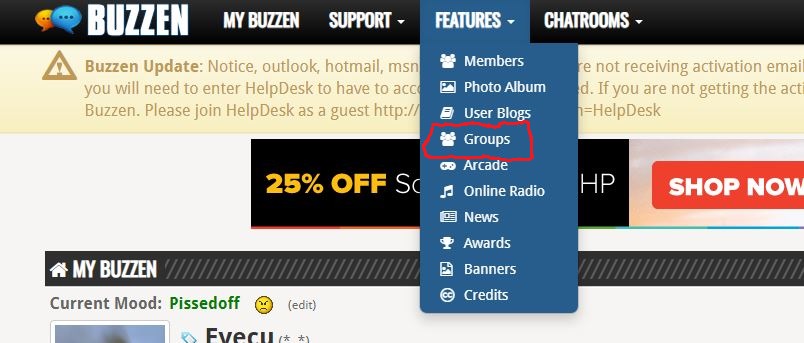
The first step is once you are logged into Buzzen. Click on Features and then Groups.
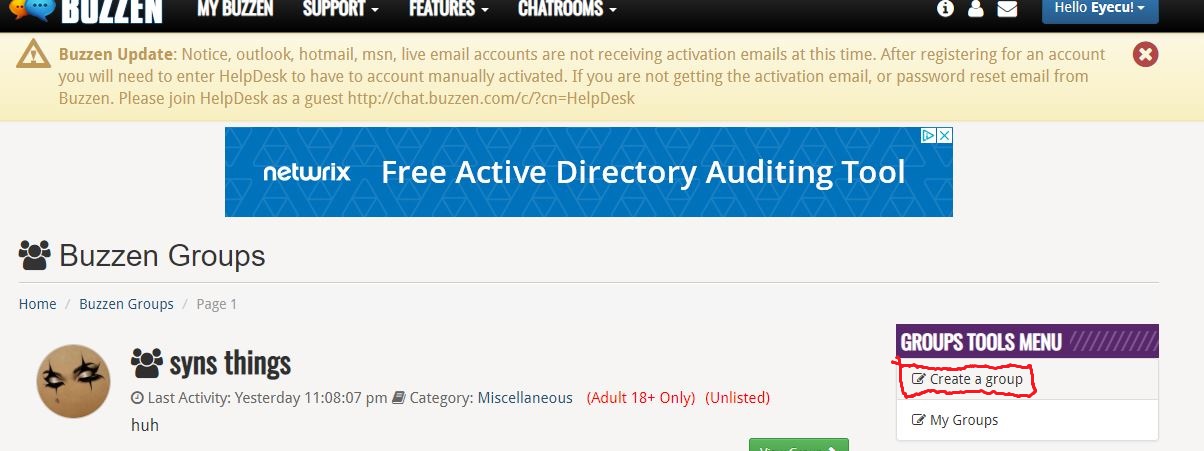
Once the group home page is loaded. On the right hand side under Group Tools Menu, click on Create a Group:
This will load the Group Create page:
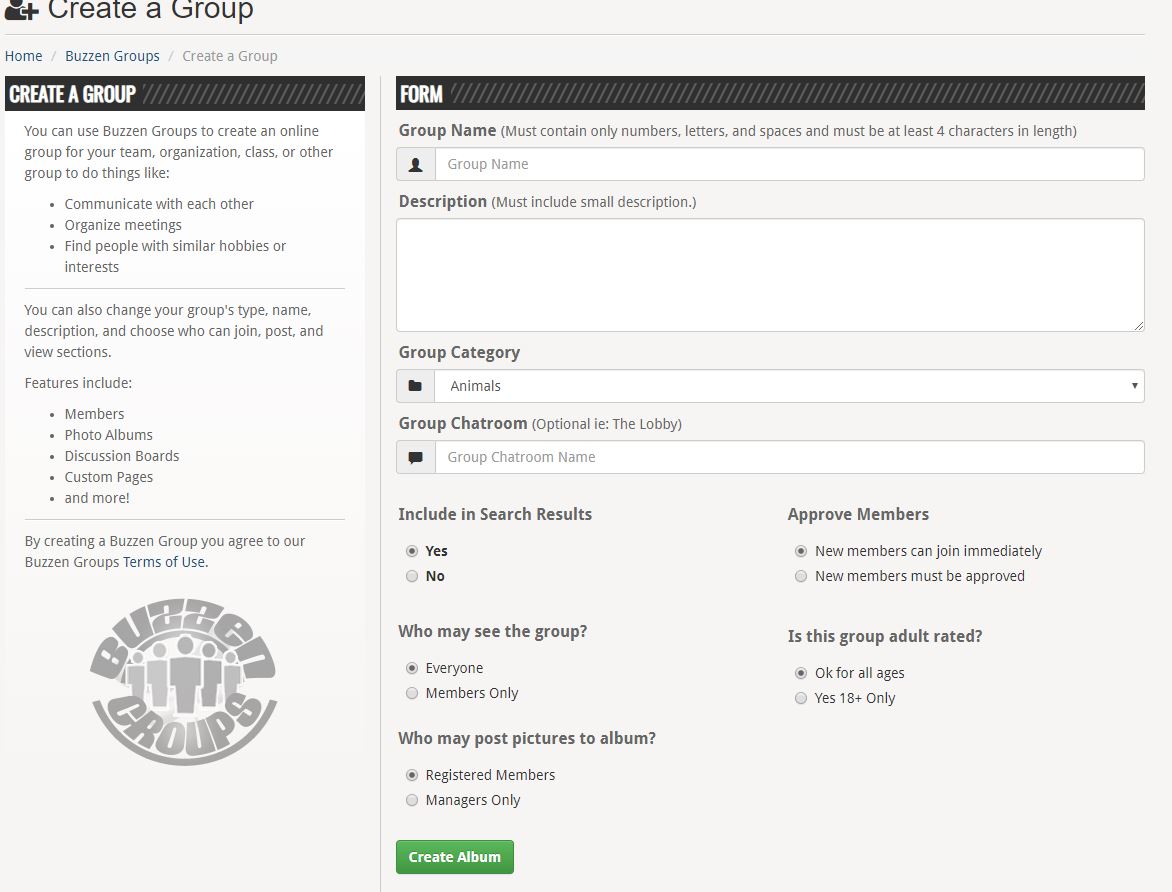
Group Create Page explained:
Group Name: This is the Viewable name of your group IE. Computer Help Group
Description: Brief description to describe your group in the Group home list. Try and make this as descriptive as possible so users know what your group is for.
Group Category: The Category that best fits your group. This will help users to filter groups when searching for a group.
Group Chatroom: At this time a group room is a regular room and will be listed in the Room List on Buzzen.com. This setting at this time just Creates a link with-in the group to the chat room (Future update will include proper group chatrooms as they were on MSN).
Include in Search: This setting makes the group publically searchable...In the group home list and searching for it. If you make it so it isn't searchable you will have to direct link to the group.
Approve Members: This setting is for how you want members to join. New members can join immediately means they can Click join this group on the group page and automatically be a member. New Members must be approved means they need to be approved by a group manager to join the group.
Who may see this group: This setting makes content viewable either by everyone(public group) or content viewable only by group members(private group)
Is this group adult rated: This setting signifies the group is for 18+ only (please note that Buzzen's Image Policy is still enforced on Groups)
Who may post pictures to album: This setting allows you to manage who posts pictures to the group: Members( all members including managers) or just managers
Once you have all the information filled out and Settings the way you want them click the Create Album button at the bottom of the page to create the album. Your group is now created
To add discussion boards to your group follow these instructions:
Go to the group you own. From the My Buzzen Page ( when logged in the page that loads when you go to buzzen.com )
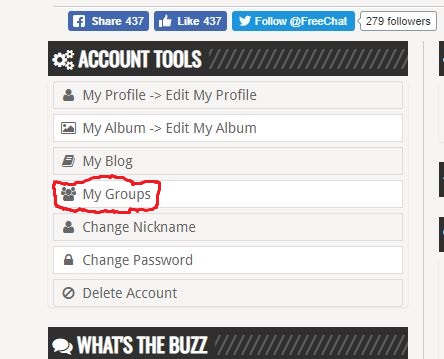
Under Account Tools Click on My Groups:

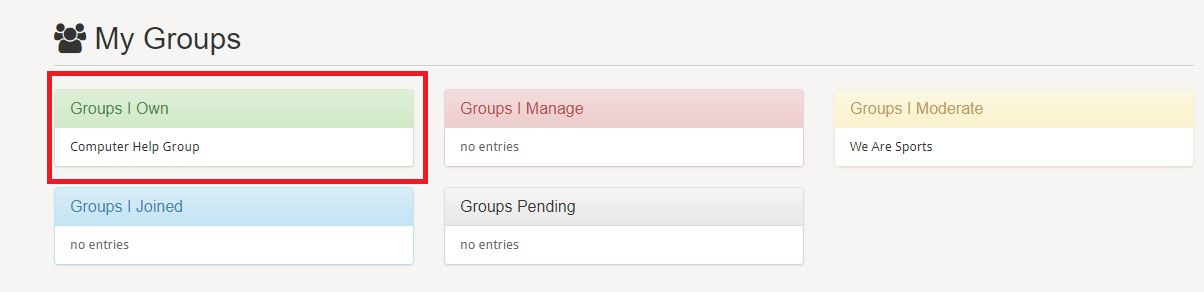
This will load a page that lists all the groups you belong to, separated into groups of groups you own, manage, moderate, or a member of. In the list of Groups you own click on the group you want to set the discussion board up for:
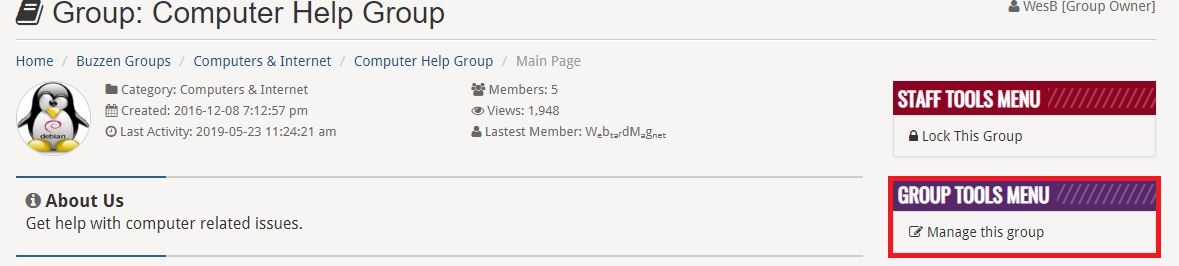
This will load your groups home page, on the right side under Group Tools Menu click on manage group:
This will load the group management page. From the menu Click on Discussion Board as shown in the following image:

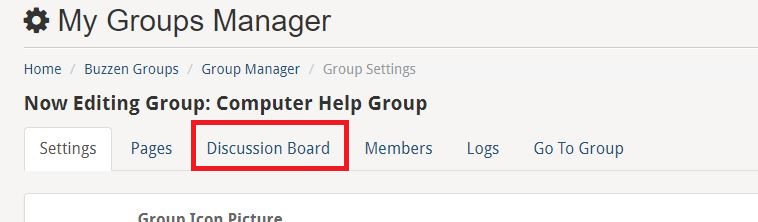
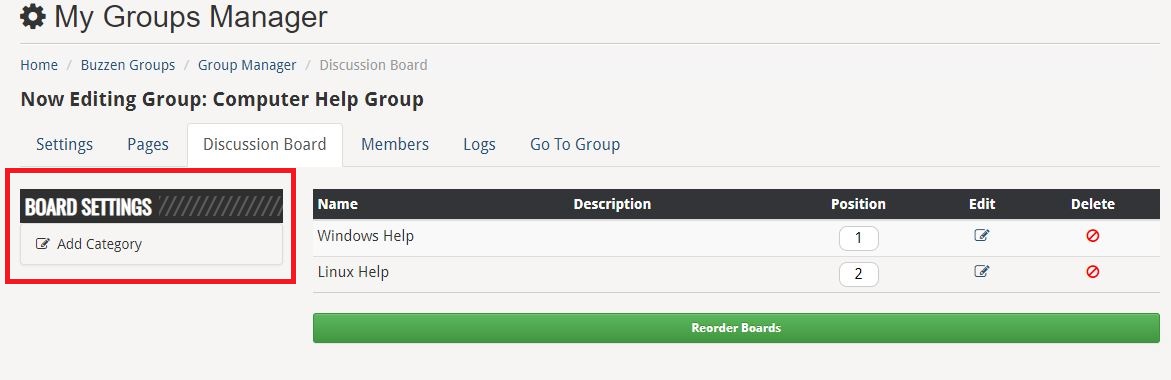
On the Discussion Board management page click on Add Category under Board Settings on the left side as shown:

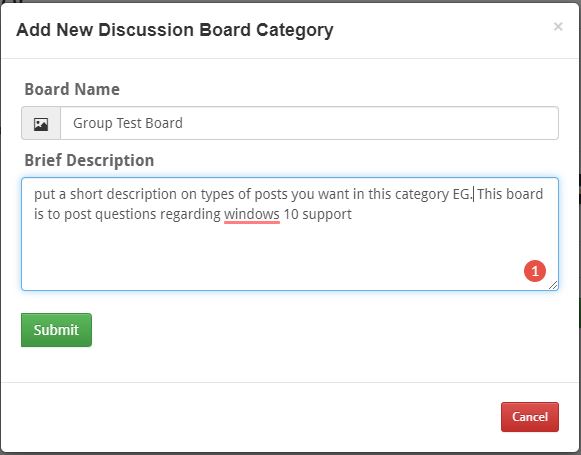
This will load the Add Category dialog. Enter the information you want as shown in the following example and click the submit button when complete:
Your discussion board is now created. You can add multiple categories for different topics.
The following will discuss the various settings and meanings in managing your group.
Once you are on your group page, on the right-hand side click on the Manage this Group link as shown:
This will load the main settings page for your group. On this page, you can manage various settings for your group. In this faq, we will deal with the main settings for the group.
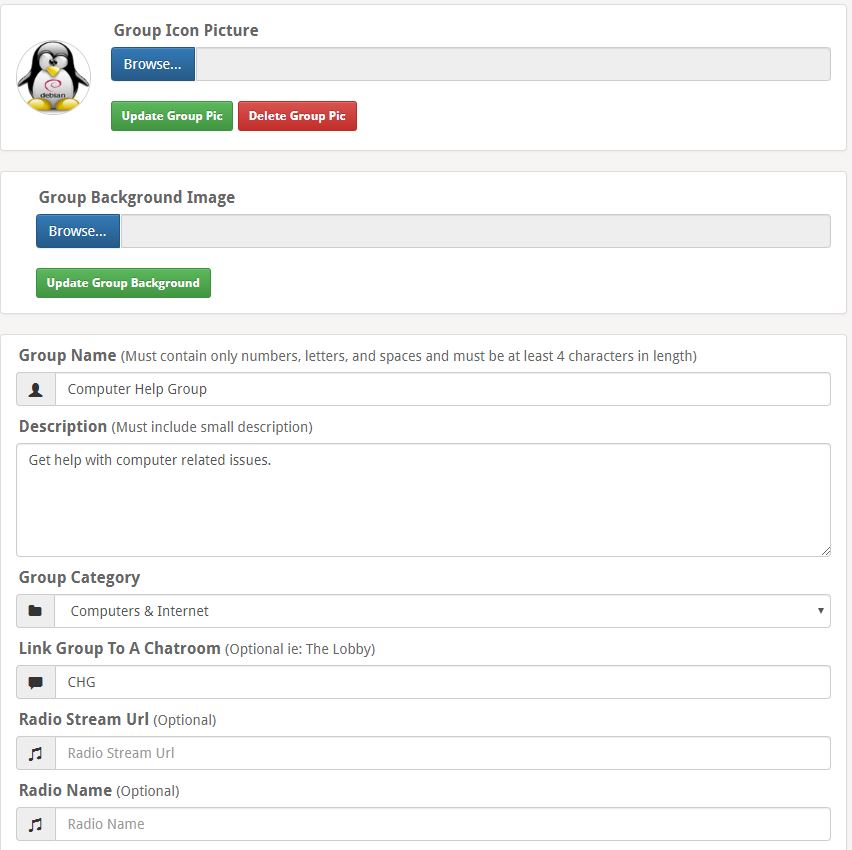
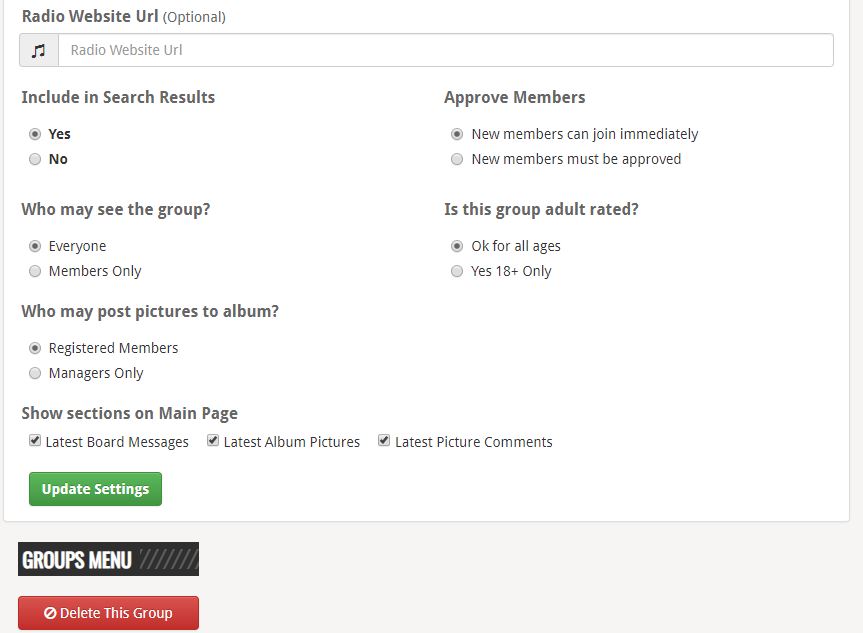
We will go through each setting and give a description of what they do.
Group Icon Picture: This is the icon that will be displayed in the groups listing page, and displayed on the group statistics at the top of the group when on the group home page.
Group Background Image: This will set the background image for the group
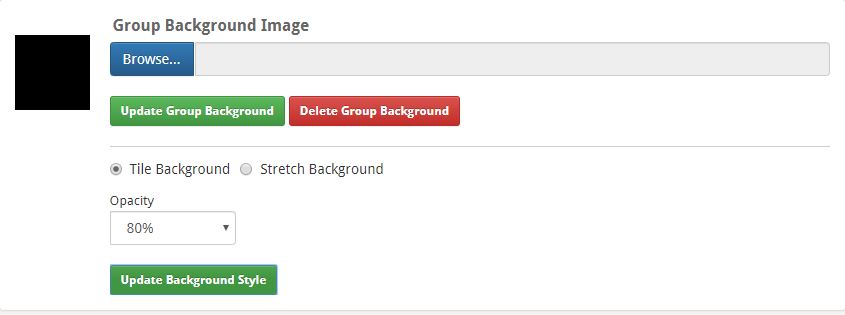
Once you click the browse button for the Group Background Image and select the image you want, Click the Update Group Background button. Once the image is uploaded you are given some style options for the image. As shown above
Tiled Background: Tiles the background repeating the image over and over to cover the whole settable area
Stretch Background: Stretches the background to cover the whole background area.
Opacity: Sets the opacity ( how much you can see the background image through the main body of the group ).
Once you select the options you want, click the Update Background Style button.
Group Name: This setting is where you can manage the name of your Group. You are able to change the group name.
Description: This setting allows you to manage the description of your group. Be as specific as possible so users know what your intended use of your group is.
Group Category: This setting allows you to manage the category your group is in. Used for the groups listing so users can more easily find groups that might interest them.
Link Group to a Chatroom: This setting is used to set a Chatroom link in the group. As shown as and example The Lobby. Would put a link in the group that will join members to The Lobby.
NOTE: At this time there are no actual group chatrooms like on msn. This setting just links to a normal chatroom that will show up on the main chatroom listing on Buzzen.com.
Radio Stream URL: This setting allows you to add a radio link to your group.EG https://www.sizzleradio.com/player.php Adds a link to the Navigation menu labeled Radio. When clicked on you will get a popup with the group player to listen to the radio. On this popup it will display the radio name set in the next option.
Radio Name: This setting allows you to set the Name of the radio stream as you wish EG Sizzle Radio. Note this will be displayed on the group player popup
Radio Website URL: This setting is used to link to the website of the radio station you set in the preceding options. EG https://www.sizzleradio.com Note: In the group player popup you can click on the Radio Name set in the previous option and it will open a new tab to the radio stations website.
Include in Search Results: This setting allows you to manage if the group is shown in the main group's page search results. Say your group is name Computer Help Group and a user searches for Computer. This setting will allow it to be returned or not in that search result.
Approve Members; This setting allows you to manage how group membership is handled IE user clicks join button they are either immediately made a member of the group, or must wait for a group staff member to approve their membership.
Who may see the Group: This setting allows you to set who may see the groups content IE Everyone - anyone may see it, or Members - only members can see the content.
Is this group adult rated: This settings allows you to manage the groups rating. Okay for all ages - Means the group is good for all ages and contains no adult content or discussions. Yes 18+ Only - Group has content or discussions adult in nature and membership must be 18+.
Who may post pictures to album: This setting allows you to manage who may post images to the group albums. Registered Members - Any member of the group can upload images to the group. Managers Only - Only Managers and the Group Owner can upload images to the group.
Show Sections on the main page: This setting allows you to manage what sections are shown on the main page of the group. In the main content area.
After any changes are made you must click the Update Settings button in order for them to take effect
This faq we will discuss managing Pages in your group.
The first step in group pages is to create a new page. To do this follow the following steps:
1) From your group's main page click on the Manage this Group button on the right side
This will bring up the main group management page. Click on the Pages tab in the management console as shown:
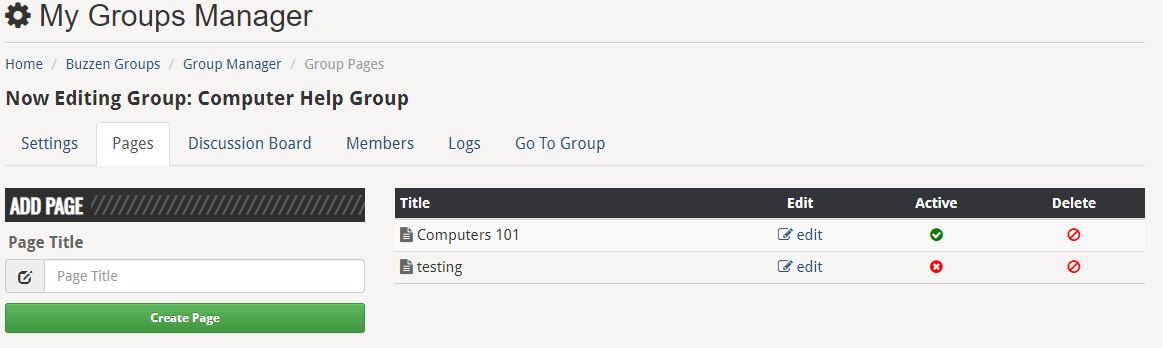
As Shown above this the Groups pages management. On the left-hand side you see Add page. This is where you enter the name of the page as you want it listed. (shown in the image if you want a page named testing) enter that in the input box and click Create Page. This will add the page and it will now be listed on the right.
All created pages for your group will be listed on the right-hand side. Title is the page name.
The right-hand side also has a few other options listed:
Edit: When you click the edit option for the page it will bring up the page content editor. This is where you can add content to the page to be displayed to the group.
Active: Clicking this option will activate or deactivate the page. If the page is deactivated No one in the group will see the page listed on the main group.
Delete: Will delete the page from the group. NOTE: Once the page is deleted it will not be recoverable
Group Page content editor:
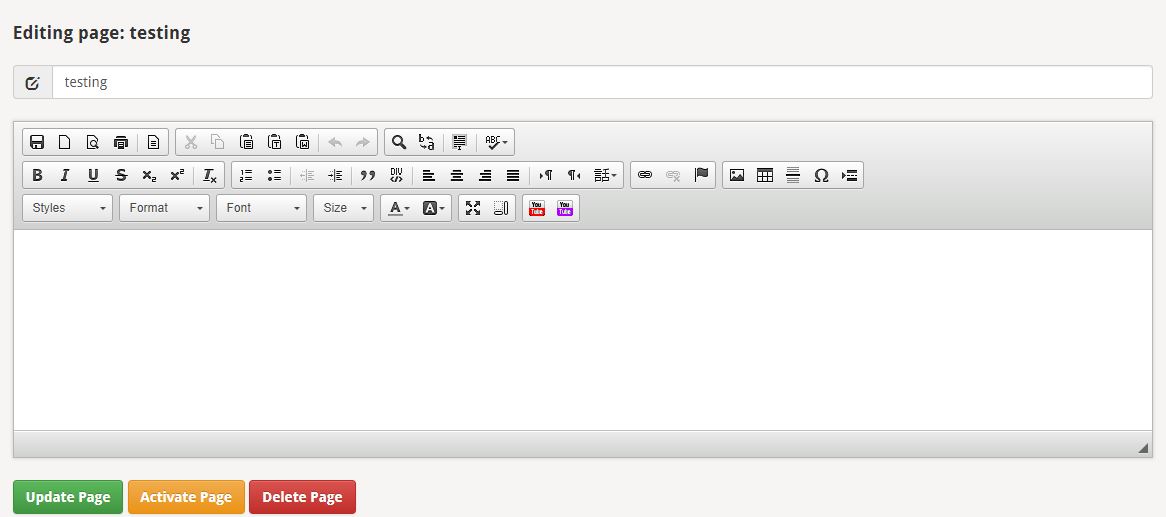
The preceding image shows the pages editor. We will explain what each icon and option in the editor does.
The first option is the page name. You can change it here if you wish

The next part is all the options for making your page unique and format it the way you wish.

We will go through each set of options and give a brief description of what they do.
You can use any IRC client that supports %#roomname. The most common client to use is mIRC. However other clients such as X-Chat work equally as well.
A script or bot is an IRC program. An example of an IRC program is mIRC, mIRC is a program that allows you to connect to an IRC server. Just like you need a web browser to connect to HTTP servers and view websites (firefox, IE, Chrome), you need an IRC client to connect you to IRC servers and join in channels on the server. The script or bot allows the users more options within a chatroom as an owner or host than in webchat. Some examples of these options are: Customized kicks, automatic hammer distribution, setting modes such as "invite" and much more.
NOTE: Using a script or a bot will not allow you to see sensitive information such as IP addresses. Users do not have access to such information on Buzzen.
The most common place to download bots and clients made specifically for the Buzzen Chat network can be found by visiting TG007.net
In order to authenticate an account on the Buzzen Chat Network using an IRC client you first must create an account and join a room with it using the web chat. Then you can connect with your IRC client and authenticate using the following structure.
LOGINH <email> <password in md5 hash format>
You can connect to irc.buzzen.net
irc1.buzzen.net thru irc10.buzzen.net
irc1 thru 10 are currently unavailable.
SaberTooth is a client made by the creator of our chat software. It will allow you to connect to buzzen and will give you access to options you would not normally have using the regular webchat. You can get more information and download the client by visiting http://net-bits.net/Home/sabertooth
You can edit your Buzzen profile by visiting https://www.buzzen.com/editprofile.html. You must be logged in to edit.
You can add or remove pictures from your photo album by visiting https://www.buzzen.com/editalbum.html. Note you must be logged into your account.
The Buzzen Friend list allows you to add friends in order to share and communicate with. Many options on Buzzen are friend share only so if the Buzzen member is not on your friends list they will not be able to see what you have shared on Buzzen. In order to send a friend request please use the Add Friend button. You can manage your friends by using your Friend Manager located at https://www.buzzen.com/friends.html.
To add age or location to your profile please click Here.
Profile Name is the name used in the URL to your profile
Profile Name can not contain special characters or spaces, if you want an empty space use _ underscore, like my_name.
only A-Z, a-z, 0-9 and underscore characters are permitted in profile name
You can send and recieve private messages from other Buzzen members. To manage your private messages please visit https://www.buzzen.com/messages.html
Please make sure you have allowed popups from Buzzen on your browser. Also make sure you are not using any toolbars on your browser that blocks popups.
You can have profiles open in a new tab instead of a new window.
In Internet Explorer, click the Tools button, and then click Internet Options.Click the General tab, and then, under Tabs, click Settings.In the Tabbed Browsing Settings dialog box, click Always open pop-ups in new tab, and then click OK twice
In Firefox, click the Tools, and then click Options. Click tabs, and then, under Tabs, click open new window in new tab instead, and then click OK
Once you change your gender in your profile and save, you should then log out and log back in. Then visit a chat room page. Your gender icon should be updated. If not please visit the Helpdesk or open a support ticket at https://www.buzzen.com/supportticket.html.
There are several causes as to why you might be unable to sign-in.
Sign-ins are controlled by Cookies on your browser. Please make sure that cookies are allowed to be saved in our browser options. If they are you can try cleaning out your cookies and temporary files then try to sign-in again.
If you are still having trouble you can try our alternate sign-in page located at http://chat.buzzen.com
If you are still unable to sign-in please visit the Helpdesk and a staff member will assist you.
To disable popup block in Microsoft Edge:
1) Click the three dots 
2) Scroll down and click Settings
3) Scroll Down and click on View Advanced Settings
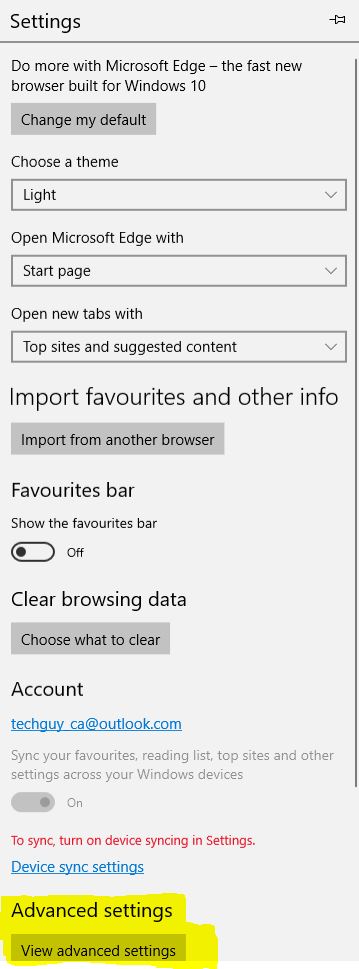
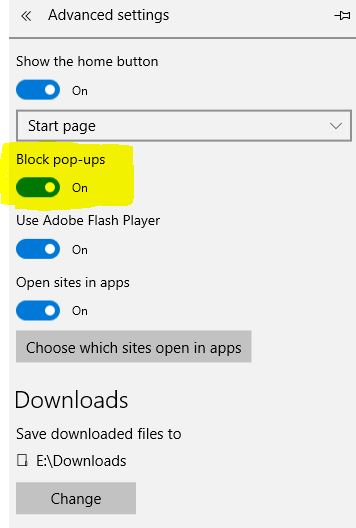
4) Toggle the Popup Blocker to off.
5) Close out the settings by clicking the menu button (3 dots).
To manage popup exceptions in Internet Explorer 11:
1) Click on the Menu button  can be found at the top right of the browser.
2) Scroll through the list and click on Internet Options
3) In the Internet Options Popup Click on Privacy

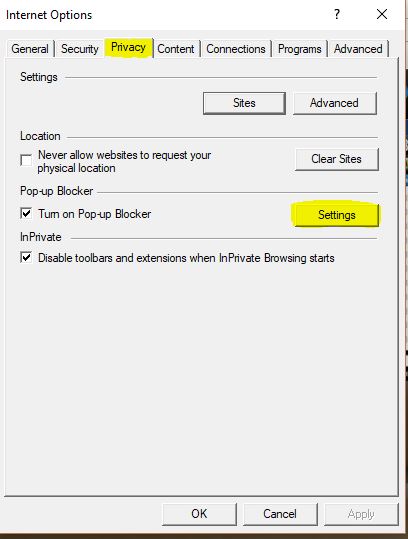
4) Click on the Settings button to the Right of Turn on popup blocker as highlighted in the previous image.
5) In the popup enter the following sites, then click add after each. *.buzzen.com and chat.buzzen.com

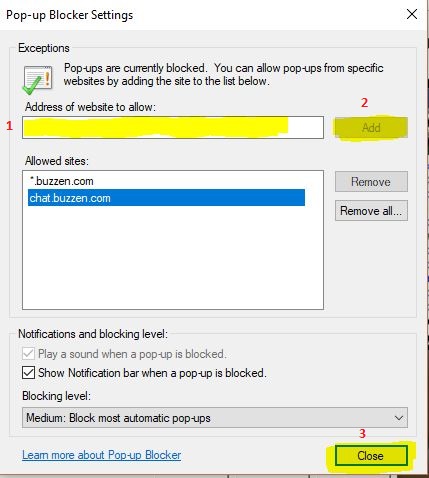
6) After both sites are added click the close button, then close the Internet Options dialog.
To manage popups in Google Chome:
1) Click on the Chrome menu button at the top right  it should be directly under the X to close the broswer
2) Next Click on Settings in the List. This will bring up the Settings Page:
3) Scroll down and click on Advanced.
4) Scroll down more and find Content Settings, and click on it.
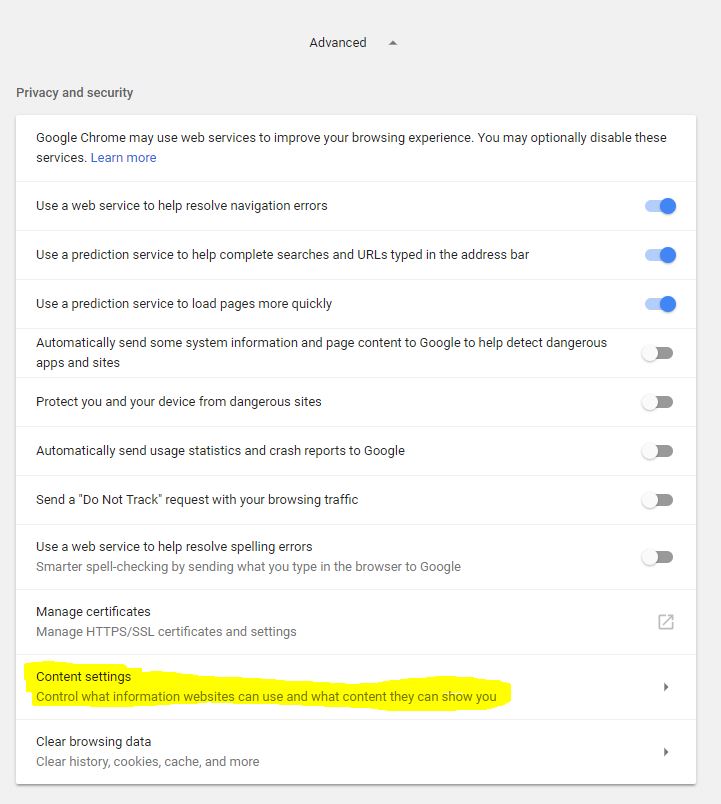
5) Click on Popups
6) Click on the Add as highlighted in the Following picture
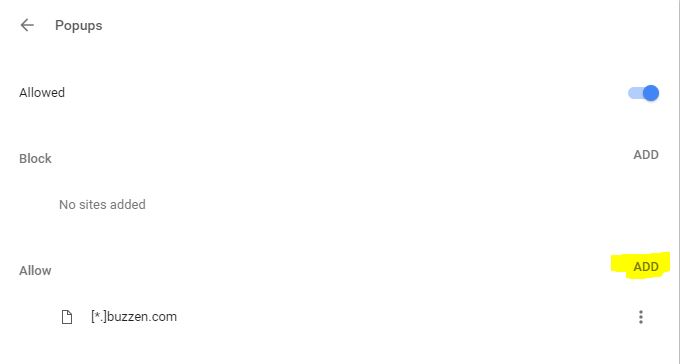
7) Add in the editor the pops up [*.]buzzen.com (as shown in the previous image) Then click the add button.
8) Close out the settings page by clicking the x on the settings tab.
To manage popup exemptions in firefox:
1) Click on the firefox menu button  directly under the X to close the browser at the top right.
2) Click on options in the list.
3) On the Options window Click on the Privacy and Security on the left side
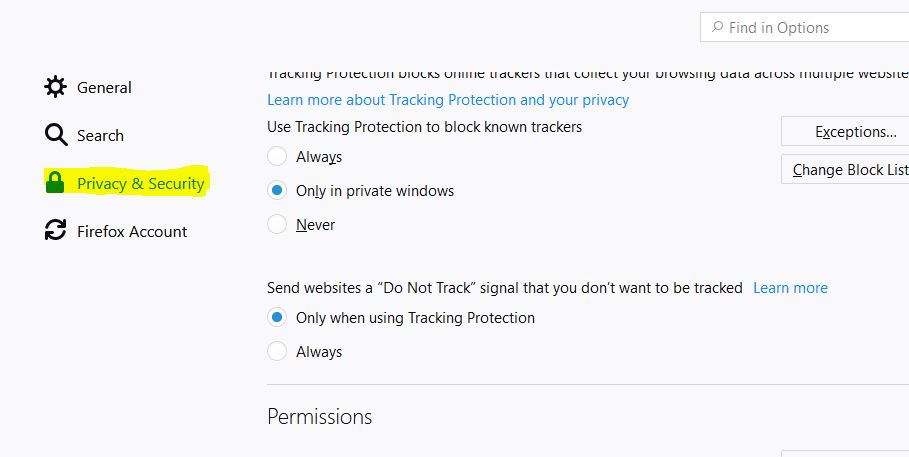
4) Scroll down and under Permissions you will see Block pop-up windows and a button on the right labelled Exceptions. Click the Exceptions button
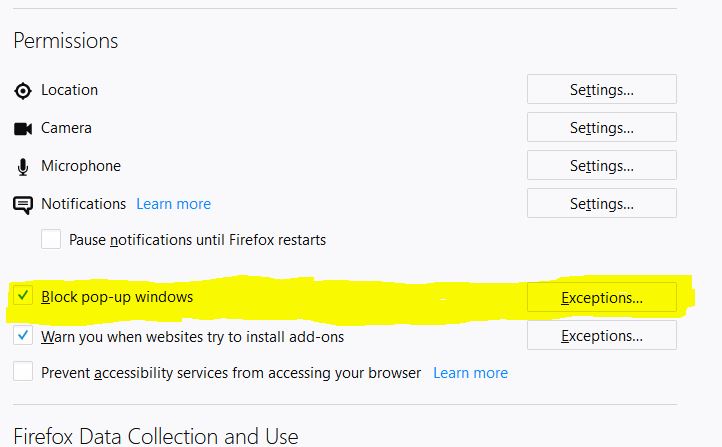
6) In the Exceptions window add the following addresses: https://www.buzzen.com and http://chat.buzzen.com
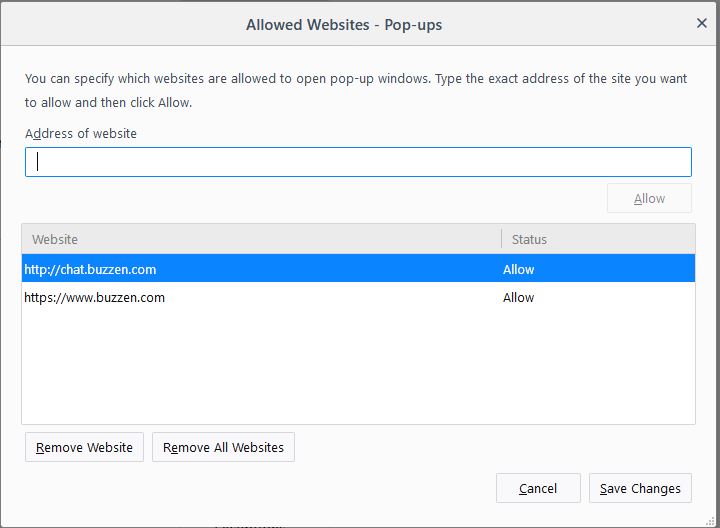
7) Click the Safe Changes button on the lower right. Then close out the options window.
To delete cache and temp files on Microsoft Internet Explorer:
NOTE: Make sure all taps related to Buzzen are closed before starting!
1) Click on the Internet Explorer Menu icon found at the top right of the browser.
2) Scroll down and click on Internet Options.
3) In the dialog that pops up approximately 3/4 of the way down the dialog you will see Browsing History, and two buttons Delete and Settings. Click on the delete button and let it right through the process.
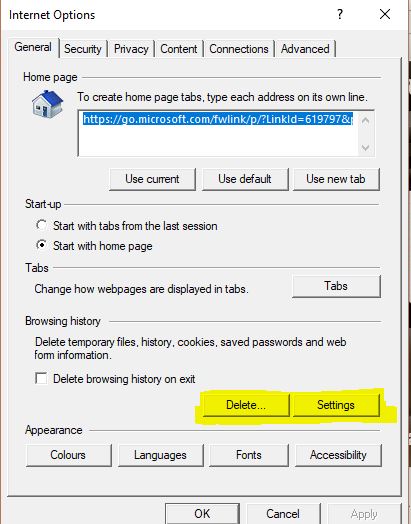
4) Once complete click on the OK button at the bottom of the dialog. This will close out the Internet Options dialog. Reconnect to Buzzen, sign in, and join a room like normal.
To clear cache on Google Chrome Browser:
NOTE: Make sure all Buzzen related tabs are closed before proceeding.
1) Click on the Chrome menu button found at the top right of chrome browser.
2) Click on History and then in the slide out click on History again.
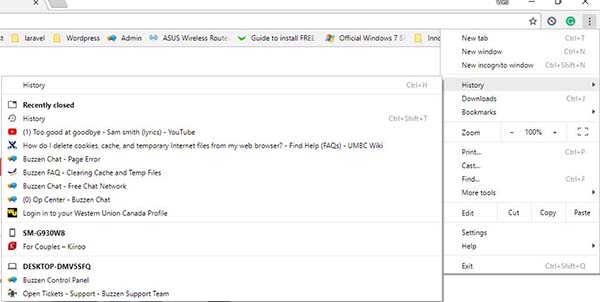
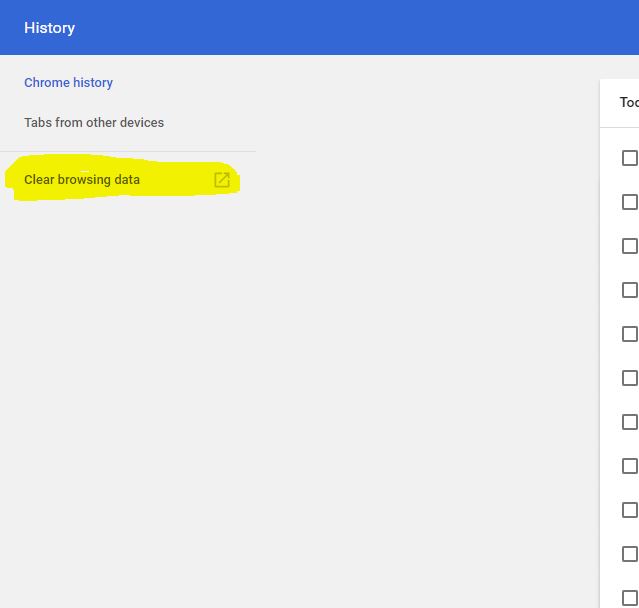
3) In the History tab that opens up. On the left hand side you will see Clear Browsing Data. Click on that.
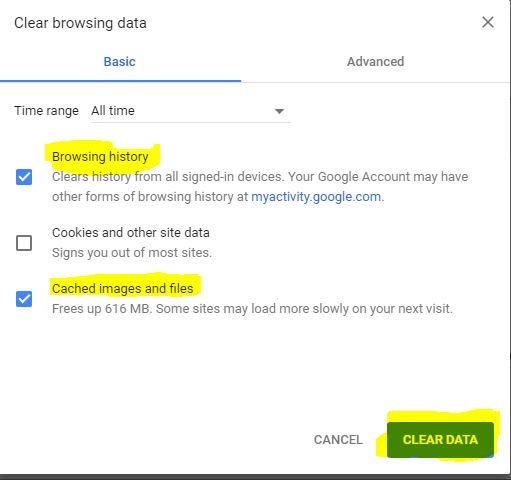
4) In the popup make sure Browsing History and Cached images and files are check marked. Then click on the Clear Data button at the bottom right.
5) Once complete, you can close out the history tab. Reconnect to Buzzen, sign in, and join a room like normal.
To clear cache and temp files in Mozilla Firefox browser:
NOTE: Before proceeding close all tabs related to Buzzen Chat.
1) Click on the Firefox Menu icon found at the top right of the browser
2) Scroll down and click on Options
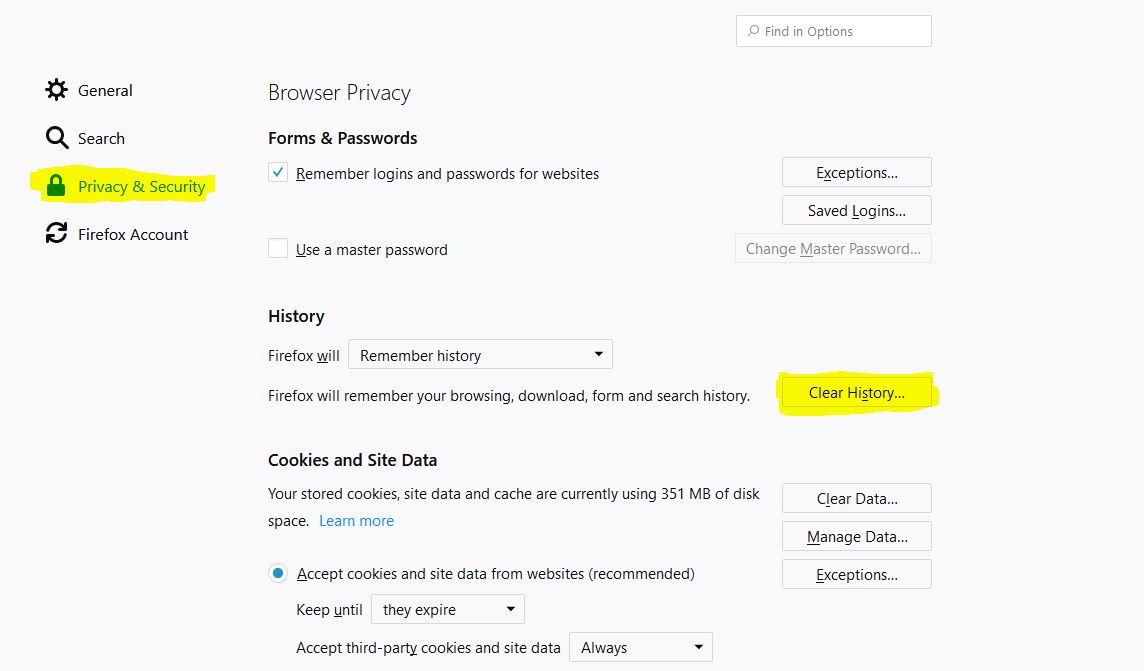
3) In the Options dialog click on Privace and Security on the left side. Then click on the Clear History button as shown in the following image:
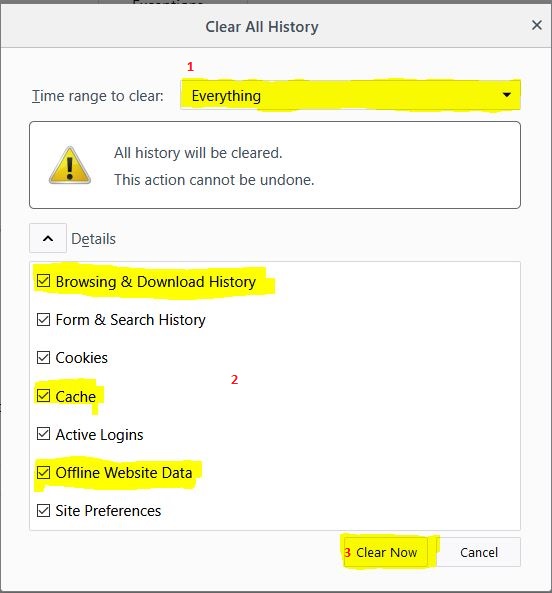
4) In the Clear History Dialog that pops up select the settings you need. Make sure the highlighted options in the following image are check marked, then click on the Clear Now button at the bottom right of the dialog.
5) When done the Clear History dialog will disappear. You can close out the options tab. Reconnect to Buzzen, sign in, and join a room like normal.
Currently the rooms are listed by most number of users by default. This is to move rooms with 0 users to the bottom of the list making the rooms near the top more relavant. In the past the rooms were listed by alphabetical order. This option is still available. There are several options for re-ordering the lists. You can use the dropdown menu to order by room type ie: Buzzen official rooms, Buzzen supported room, or User created rooms. You can also order the list by alphabetical order, or language. To do this you will need to click on the Header name. ie: Room name, Users, or Language. If you are having a hard time finding a room you can use the Search page located @ https://www.buzzen.com/searchrooms.html
Once you set a blog post or photo album to private only you and your friends can view them. This includes latest informaiton on your profile.
Of course you can! We depend alot on our users helping us to spread the word about Buzzen. We have created a few banner types that you can add to your website to link back to us. You can find them by visiting https://www.buzzen.com/banners.html